


Honeypot Ultimate Guide
Ultimate Guide to Honeypot Ants:
Useful Tools
Hey everyone, dave here. Hope this guide is helpful towards your helping you choose an ant colony or taking better care of your honeypots!
Here is the essential tools for successful honeypot ant colony maintenance. It makes a huge difference in the health of your colony, and won't cost much to grab on your way before you leave the site.
-
Featherweight Tweezers: Moving ants. Be sure to grab the ants by their thorax (their middle part) whenever possible. Avoid picking them up by their abdomen, you may injure them this way.
-
Glass Nectar Fountain: Allows for easy access to fresh water for your ants. The tower features a durable and leak-proof design, ensuring that water stays fresh and clean for your colony. The tower is also easy to refill and clean, making maintenance a breeze. Its compact size makes it easy to fit in any ant habitat, while the clear design allows you to monitor water levels at a glance.
-
Feeder Plates: Protein sources can quickly dirty your formicarium. To avoid any permanent stains, feed your ants their protein on feeder plates. These specialized plates provide a safe and convenient way to offer food to your ants without the risk of contamination or spoilage. They are designed to keep food fresh and easily accessible for your ants, and come in a variety of sizes and styles to suit your colony's needs. Try using a feeder plate for your ants and see the difference in your colony's health and growth.
-
Glass Nectar Dropper: If you can’t fit a nectar fountain in the enclosure (i.e. a glass tube set-up), feeding your ants the fluids they need with a water dropper is the next best solution.
-
Extremely Fine Quartz Sand Sediment: Some ant species raise their young in cocoons. For the ant larvae to spin the cocoons, they need fine-grain sediment. Double-check what species you have to determine if they need sediment.
-
Fluon: A non-stick coating that is commonly used in ant-keeping as a barrier to prevent ants from escaping from their habitats. This transparent and odorless coating is applied to the walls of the ant farm or enclosure, creating a smooth surface that ants cannot cling to. Fluon is safe for both ants and humans and is easy to apply with a brush or spray bottle. It is also long-lasting and can be reapplied as needed. Using Fluon in your ant-keeping setup can provide peace of mind and prevent escapees, making it an essential tool for any ant-keeper.
I have been using this toolkit for over 10 years while I kept my honeypot colonies and I never had problems in my colonies health.
BEFORE you continue, go ahead and add this into your cart regardless if you are going to checkout or not. The next time you stop by, you will know why its in your cart and it will be such a beneficial factor towards the growth of your honeypot colony.
Getting Started:
Picking A Queen Ant.
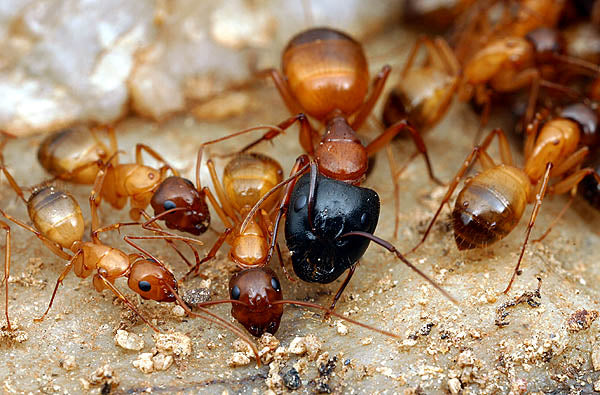
The Myrmecocystus species, also known as the honeypot ant, is a species of ant that is native to the southwestern United States and Mexico. They are known for their unique "honeypot" behavior, where certain ants within the colony are designated as "honeypots" and are fed until they become engorged with food, which they then regurgitate and share with the rest of the colony.
Honeypot ants are opportunistic foragers and will eat a wide variety of food including nectar and insects.
In terms of growth, honeypot ants grow relatively slowly; it may take several months for a colony to hatch its first generation of workers. They do not sting, which makes them beginner-friendly as they are less aggressive than other ant species.
In terms of keeping them as pets, they are considered beginner-friendly because they are easy to care for and can be kept in a variety of setups, including test tubes, formicaria, or outdoor setups. They also don't require special lighting or temperature control, making them suitable for beginners.
In terms of diet, the black pavement ant is an opportunistic feeder and will consume a wide variety of food including seeds, honeydew, nectar, and small insects.
It's important to note that, while these ants are beginner-friendly, they still require proper care and attention to ensure their colony thrives. Also, it's important to obtain them ethically and legally as wild-caught colonies may be protected by law. There are species that bloat up like honeypots all over the USA, and we make sure that you are able to get them via eggs
What to Look For When Buying Honeypot Ants:
When buying queen ants, it's important to look for certain traits that indicate the queen is healthy and suitable for starting a new colony. More importantly, get your ants off of a supplier you trust as they will make sure all of these traits are in the ant species you buy online. Here are some traits to look for that Planted ANTS recommends:
Size: A healthy queen ant should be of a suitable size for her species. Some species have larger queens than others, but in general, a queen should be slightly larger than the worker ants.
Condition: A healthy queen ant should be active, alert, and have a plump and healthy-looking body.
Wing condition: Most queens lose their wings once they’re fertilized.
Behavior: The queen should be responsive and active, and should be able to move around without difficulty.
Age: The queen’s age can be determined by how many eggs and workers she has. Queens with workers are older and more likely to survive.
Breeding: It's also important to check the origin of the queen, some queens are collected in the wild, while others are bred in captivity. Breeding queens are more likely to be well-adapted to captivity and have a better chance of starting a colony.
It's important to note that, while buying queen ants can be a good way to start a colony, it's also important to consider the ethical and legal aspects of buying wild-caught ants. Additionally, it's always best to buy ants from a reputable breeder, who can provide you with healthy queens and give you advice on how to care for them.
Ant-Specific Needs: Honeypot Ants
Honeypot ants, also known as Myrmecocystus species, are a unique and interesting species that require some special care to thrive in captivity. Here are some special care needs to consider when keeping honeypot ants:
Food: Honeypot ants are known for their love of sugary foods, such as nectar and honeydew. They also consume small insects, such as aphids. They require a diet that is high in sugar and protein.
Temperature: Honeypot ants prefer a warm and humid environment. In captivity, they should be kept at temperatures between 75 and 85°F (24-29°C) and with a humidity level between 50 and 70%. They need to be kept in a formicarium with a heating system or a heat mat to maintain optimal temperature.
Sand: Honeypot ants need a substrate that is fine enough for them to create cocoons, which are used to pupate their eggs and larvae. They need fine sand for that, as it helps to keep the cocoons moist and protected.
Formicarium: They are known to hang from the ceiling of their nests, so they will need a vertical nest.
Growth rate: Honeypot ants have a relatively slow growth rate and workers may take several months to reach maturity. This means that it may take some time for a colony to establish itself and produce a large number of workers.
Growing: Queen in Tube
Tube Care:
Taking care of an ant queen in a glass tube is an important task that requires attention and care.
Here are a few tips to keep in mind when caring for your queen:
1) Make sure the glass tube is clean and free of debris. A clean environment is essential for the queen's health and well-being.
2) Provide a suitable environment for the queen, this means a temperature of around 80-85°F and humidity of 50-60% is ideal.
3) Provide a source of food and water, this can be done by using a small cotton ball dampened with sugar water. Be sure to change the cotton ball and refill the water source as needed.
4) Keep the queen in a dark, quiet location. Ant queens are sensitive to light and noise, so it's important to provide a peaceful environment for them.
5) Monitor the queen once every two weeks (not often) to ensure that she is healthy and active. If you notice any signs of distress, such as lethargy or lack of appetite, consult an ant-keeping expert for advice.
By following these steps, you can provide the best possible care for your queen and give her the best chance of starting a healthy colony.
Estimated Time to Lay for Honeypots to lay eggs: 7-10 days
Note: The time it takes for an ant queen to start her colony can vary depending on many factors, including the species of ant, the conditions of the environment, and the availability of resources.
In general, it is difficult to predict exactly how long it will take for an ant queen to start her colony, as many variables can affect the process. However, with proper care and attention, the queen can be given the best chance of starting a healthy colony.
Growing: Ant Queen with Larvae
-
Estimated Time for Larvae to Appear: 7-14 days
-
How to care for Larvae: Protein-Feeding always helps
In ant colonies, the brood, or baby ants, are the future of the colony and require a diet high in protein to grow and develop properly that is usually provided from the queen during the first generation. Although honeypots are claustral ants (meaning that they don't need food until they get workers), it is always better to give them a little protein to help with the growth of the first batch of workers.
Growing: Ant Queen with Workers
-
Estimated Time for Workers: 40-50 days
-
Approximate Number: 3-10 workers
Nanitics, also known as "first-generation ants," are the first ants that are born in a new colony. They are typically small in size and have not yet developed strong bodies. They are usually the first ants to be produced by a colony and are responsible for building and maintaining the colony. They are also responsible for foraging for food and taking care of the queen and other young ants.
Nanitics are usually not as strong as future worker ants, but they are still able to perform important tasks such as foraging and caring for the colony's brood. Their small size also allows them to navigate through tight spaces and access hard-to-reach areas in the colony. They have a vital role in the colony as they are the ones who take care of the queen and the young until the mature workers are developed.
It's important to note that, nanitics will eventually grow and develop into mature worker ants as they age and the colony grows. The colony will continue to produce new nanitics to replace the older ants as they die or retire.
NOTE: These are the most important workers a queen can have. Avoid killing or losing these ants at all costs.
Feeding within Tube with Workers
Taking care of an ant colony in a glass tube is an important task that requires attention and care. Here are a few tips to keep in mind when caring for your colony:
-
Gather your materials: You will need a pair of forceps or featherweight tweezers, and a small cotton ball soaked in nectar.
-
Remove the cotton ball from the glass tube. Remove any residue and/or past food left in the tube.
-
Carefully use the tweezers to insert the small cotton ball/food into the tube.
-
Handling escapees. If there are escapees, use your tweezers to carefully pick up the escapee ant and drop them back into the tube.
-
Seal the glass tube with a cotton ball. Make sure that it fits snugly.
-
Monitor the colony regularly to ensure that they are healthy and active. If you notice any signs of distress, such as lethargy or lack of appetite, consult an ant-keeping expert for advice.
By following these steps, you can provide the best possible care for your queen and give her the best chance of starting a healthy colony.
Moving Colony from Tube to Formicarium
-
Estimated Time before Moving: 60 days
Moving Your Ants
Here are some instructions on how to move ants from a test tube to a formicarium:
Extracting Queen First*
Use a paintbrush: Use a small paintbrush to gently coax the ants out of the test tube and into the formicarium. You can also use a toothpick or a small stick to help guide the ants.
Transfer the ants: Carefully transfer the ants to the formicarium using forceps or tweezers. Be gentle and try not to crush any of the ants.
Release the ants: Once you have transferred the ants, release them into the formicarium and give them some time to explore their new home.
Observe: Observe the ants for a few days to make sure they are settling in well and are able to find food and water.
Clean the test tube: Once you have transferred all the ants, clean the test tube thoroughly to prevent contamination and for future use.
Gather your materials: You will need a formicarium, a test tube, a pair of forceps or tweezers, and a small paintbrush.
Prepare the formicarium: Make sure that the formicarium is properly set up and ready for the ants to move in. The formicarium should have a suitable substrate, a water source, and a food source.
Locate the colony: Carefully remove the test tube from the incubator and locate the colony of ants at the bottom of the tube.
It's important to note that this process should be done gently and with care, as the ants are delicate creatures, handle them carefully and with respect. Also, make sure to observe the ants for a couple of days after the transfer to ensure they are doing well and have settled in the new formicarium.
Colony Care:
Honeypot ants, also known as "repletes," are a type of ant that have special storage cells called "honeypots" in their colony where they store food. Here is a guide on the temperatures, humidities, food, and care required for honeypot ants:
Temperature: Honeypot ants require a warm and humid environment. The optimal temperature range for honeypot ants is between 75-85 degrees Fahrenheit (24-29 degrees Celsius).
-
How to maintain temp (heat mat…)
Humidity: The colony's humidity level should be kept between 60-80%. Get a good honeypot nest that can hold the correct humidity here.
Substrate: Provide a substrate of sand or soil for the ants to burrow in.
Food: Honeypot ants require a diet high in carbohydrates and proteins. Offer them a variety of fruits and vegetables such as apples, grapes, and carrots. They also need protein sources such as small insects or mealworms. Provide small amounts of food daily, so as to not overfeed.
Water: Honeypot ants require a steady supply of water. Provide a small water dish for the colony or mist the substrate regularly to maintain a suitable level of humidity.
Monitoring: Regularly check the colony for signs of disease or pest infestation. If you notice any issues, take steps to address them immediately.
Privacy: Honeypot ants are sensitive to disturbance, so it is important to give them a quiet and private space to live in. Avoid moving the colony around too much and minimize handling of the ants.
Isolation: Honeypot ants are susceptible to diseases, so it is important to keep them isolated from other colonies to avoid fighting and the spread of disease.
Overview: Colony Stages
Feeding
When feeding live food to your ant colony, it's important to consider the colony's needs and the size of the food source. Here are some guidelines for when to feed live food to your ant colony:
-
New colonies: When setting up a new colony, it's important to provide a steady food source to help the colony establish itself. Feed the colony small amounts of injured/freshly killed protein, such as small insects or mealworms, daily or every other day.
-
Established colonies: The size of your colony will also play a role in how often you need to feed live food. A larger colony will require more food than a smaller colony.
-
Seasonal fluctuations: Ant colonies may experience seasonal fluctuations in activity and food needs. During the warmer months, colonies may require more food and water, while during the colder months, they may require less.
-
Observe: Observe the colony's behavior and food storage to determine if the colony needs more or less live food. If the colony is storing large amounts of food, you can reduce the frequency of feedings. If the colony is not storing enough food, increase the frequency of feedings.
It's important to note that overfeeding the colony can lead to health issues and a disordered colony. Also, when feeding live food, make sure to provide a variety of food sources to ensure a balanced diet for the colony.
Maintenance: Formicarium (ant nest)
-
Signs of Colony Health
-
Less Brood = Needs More Protein
-
In ant colonies, the brood, or immature ants, are the future of the colony and require a diet high in protein to grow and develop properly. If a colony has less brood, it may need to be fed more protein to ensure the survival and growth of the colony.
-
Slow = Not Enough Heat
Ants are cold-blooded insects and their activity levels are directly influenced by the temperature of their environment. If an ant colony is not receiving enough heat, the ants may appear slow or sluggish. This is because their metabolism is slowed down in response to the lower temperatures, which affects their ability to move and perform other activities.
Signs of Cleaning
Here are some signs that it may be time to clean your ant formicarium:
-
Strong odors: An ant formicarium that is not cleaned regularly can start to emit strong odors, which can be an indication that it needs to be cleaned.
-
Visible mold or fungus: If you notice mold or fungus growing in or around the formicarium, it's a sign that the formicarium is not being kept clean and dry.
-
Pest infestations: If you notice other insects or pests in the formicarium, it's a sign that the formicarium is not being kept clean and hygienic.
-
Overcrowding: If the formicarium becomes overcrowded, it can be difficult for the ants to keep the formicarium clean and hygienic. This can lead to poor health and an increased risk of disease among the ants.
-
High levels of debris: A formicarium with high levels of debris, such as food scraps or dead ants, can be a sign that the formicarium needs to be cleaned.
-
Reduced activity: If you notice that the ants in the formicarium have become less active, it can be an indication that the formicarium is not being kept clean and that the ants are not healthy.
It is important to note that different species of ants have different needs and cleaning frequencies, be sure to research the specific species of ant you are keeping to know the best cleaning schedule.
Regular cleaning of the formicarium can help keep the ants healthy and prevent disease and pests from spreading.
How to Clean:
Cleaning an ant formicarium is an important task to ensure the health and well-being of the colony. Here are some guidelines for cleaning an ant formicarium:
-
Remove the ants: Before cleaning, carefully remove the ants from the formicarium and place them in a temporary container with a food and water source.
-
Dispose of waste: Remove any dead ants, waste food, or other debris from the formicarium using tweezers or a small brush.
-
Clean the substrate: Remove the substrate and clean it with a small brush or vacuum. If the substrate is heavily soiled, you may need to replace it entirely.
-
Clean the formicarium: Clean the formicarium with a mild solution of water and vinegar or water and alcohol. Make sure to clean all surfaces, including the walls, floor, and any decorations or furniture. Rinse the formicarium thoroughly with water and let it dry completely before returning the ants.
-
Sterilize the formicarium: If the colony has had an outbreak of disease or pests, it is important to sterilize the formicarium. You can use an alcohol or vinegar solution to spot-clean food stains off the surfaces of the formicarium. Rinse the formicarium thoroughly with water and let it dry completely before returning the ants.
-
Return the ants: Once the formicarium is clean and dry, return the ants to their home. Give the colony time to adjust to the new environment before feeding them.
It's important to note that you should clean the formicarium at least once a month, or more frequently if necessary. Also, when cleaning, it is important to use mild and non-toxic cleaning products to avoid any harm to the ants.
Upgrading: Expanding Your Colony
Preparing for Expansion:
Ant colonies can typically survive in formicariums, also known as "ant farms," of any size. Expansion is an option if you want to see your colony grow. Expanding an ant formicarium can be done if you’d like to grow your ant colony to an additional formicarium. Here are some steps to follow when expanding an ant formicarium:
-
Research: Research the specific needs of the ant species you are keeping. Different ant species have different space and nesting requirements, so it's important to make sure that the formicarium will be suitable for the colony.
-
Plan: Plan the expansion by considering the size of the colony and the space that will be required for it to grow. You will also need to consider the type of expansion you want to make, whether it's adding more chambers or an additional formicarium.
-
Gather materials: Gather the materials you will need for the expansion, such as additional formicaria, tubing, or connectors.
-
Connect the formicarium: Connect the formicaria using tubing or connectors. Make sure to seal any connections to prevent leaks and to keep the colony separated.
-
Add substrate: Add substrate to the new chambers, and make sure it is deep enough for the ants to burrow in.
-
Add food and water: Provide food and water to the new chambers, making sure that they are easily accessible to the ants.
-
Monitor the colony: Monitor the colony for a few days to make sure that the ants are adjusting to the new expansion and that they have access to food and water.
It's important to note that expanding the formicarium will require careful planning and attention to detail to ensure that the colony has the space and resources it needs to thrive. Also, it's important to take into consideration the size of the colony and the specific needs of the ant species when expanding, to avoid overcrowding and stress on the colony.
-
IMPORTANT DISCLAIMER: DO NOT COMBINE ANT COLONIES UNDER ANY CIRCUMSTANCES!
Ant-keeping is a fascinating hobby, but it is important to understand that ants are territorial creatures and will fiercely defend their colony and resources from other ants. Therefore, it is important to understand that you do not combine ant colonies. Combining colonies of different ant species or even different colonies of the same species can lead to aggressive behavior and territorial fighting. This can result in the death of ants from both colonies, and can also spread diseases and parasites.
Replacement: Replacing your Formicarium
Here are a few signs that indicate it may be time to replace your ant formicarium:
-
Disease or Parasites: If you notice a high number of dead ants or signs of disease or parasites within the colony, it may be best to replace the formicarium to prevent the spread of the issue.
-
Pest Infestations: If you notice any other pests, such as mites or springtails, in the formicarium, it may be best to replace them to prevent the infestation from spreading.
-
Odor: If you notice an unpleasant odor coming from the formicarium, it may be a sign that the formicarium needs to be replaced, as it could be caused by mold or other contaminants.
-
Formicarium Damage: If the formicarium has been damaged, whether by accident or due to an external factor, it may no longer be suitable for the colony and will need to be replaced.
By recognizing these signs early, you can ensure that your colony has a safe and healthy environment in which to thrive.
Death: Reasons
There are several common reasons why ant queens may die, including:
-
Insufficient food and water: Ant queens need a consistent and reliable source of nutrition to survive. Without proper food and water, the queen will become weak and may eventually die.
-
Environmental stress: Ant queens are sensitive to changes in temperature and humidity. Extreme temperatures or fluctuations in humidity can cause stress and lead to death.
-
Disease or parasites: Ant queens are susceptible to various diseases and parasites, which can weaken or kill them if left untreated.
-
Lack of care: Ant queens require specific care and attention to thrive. Neglect or improper care can lead to the queen's death.
-
Mating failure: During the mating flight, the queen may not find a mate, or the mating may not be successful, leading to her death.
-
Inadequate habitat: Ant queens need a suitable habitat that provides the right temperature, humidity, and protection from predators. An inadequate habitat can lead to the queen's death.
-
Pesticides: Exposure to pesticides can be fatal for ant queens and the colony as a whole.
By understanding the common reasons for ant queen death, you can take steps to prevent it and ensure the health and well-being of your colony.
Typical lifespan for honeypots: 12-15 years